ChatKeeper Command Line Interface (CLI) Quick Start Guide
Note: ChatKeeper now has a Graphical User Interface (GUI), which is designed to be self-explanatory. If you are using the GUI, you don’t need this guide, so just dive right in!
In addition to its Graphical User Interface (GUI), ChatKeeper provides a Command Line Interface (CLI) that you can use simply by typing commands into your terminal or command prompt. This is useful for scripting and automation, or for those who are simply more comfortable in a terminal.
The CLI offers all of the same features as the GUI, with the exception of automatically saving and loading previous options.
ChatKeeper’s CLI usage is below. There is also a Command Line Helper to assist with your command line.
This quick start guide includes the following sections:
- Preparation
- Installation
- Syncing your ChatGPT Conversations
- Examples
- The Command Line Helper
- The base command: chatkeeper keep
- Getting help for all options
- Being extra safe, or “don’t actually touch my files!”
- Getting extra detail when running ChatKeeper
- Converting your ChatGPT conversations to Markdown
- Specifying a folder/subdirectory for new conversations
- Exporting Images
- Limiting the date range of converted conversations
- Skipping the “scan my output directory” phase
- Rewriting all conversations regardless of whether they have been updated
- Skipping archived conversations
- Combining options: a real example
- That’s It!
Preparation
First, please read the Terms of Service and EULA. It’s a quick read and (I believe) a reasonable policy, but it’s important that we start on the same page.
Installation
Install ChatKeeper using your platform’s normal installation process for the package you downloaded. The installation should automatically update your path so you can invoke the chatkeeper command from the terminal. Depending upon your platform, you might need to start a new terminal or log out and back in again. If you get some kind of error when you type chatkeeper that mentions an unknown command (or something similar), you probably need to do this.
Installing your ChatKeeper License (optional)
If you chose to purchase a license, thank you! You can enable ChatKeeper’s full functionality with a one-time command that saves this license to your hard drive.
Your license is a long line of letters and numbers that starts with something resembling “xYOURzEMAILzCOMxIc5OXgAAABsAAA…”. You definitely won’t want to type it in by hand, so start by finding the email containing your license and selecting the license text by double-clicking or triple-clicking on it, then copy it to your clipboard.
Then, to install the license, run:
chatkeeper install-license
and, following the prompts, paste your license key into the terminal.
You’ll see a confirmation message that the license installation succeeded, and then you’ll be ready to continue with all of ChatKeeper’s functionality.
If you see an error, double-check that you copied the license correctly and try again.
Syncing your ChatGPT Conversations
Before you run ChatKeeper, and whenever you want to update your local copies of your conversations, you will need an export of your ChatGPT conversations for it to operate on.
Note: It seems that from time to time, ChatGPT exports stop working for a little while. If this happens, just retry after a day or so. Hopefully OpenAI will make their ChatGPT export process more reliable. See also: Community Thread 1, Community Thread 2
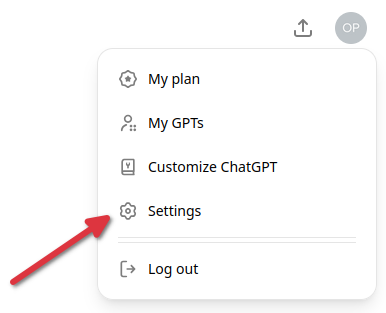
Exporting from the Web UI
- Open the user menu in the lower-left corner and choose “Settings”
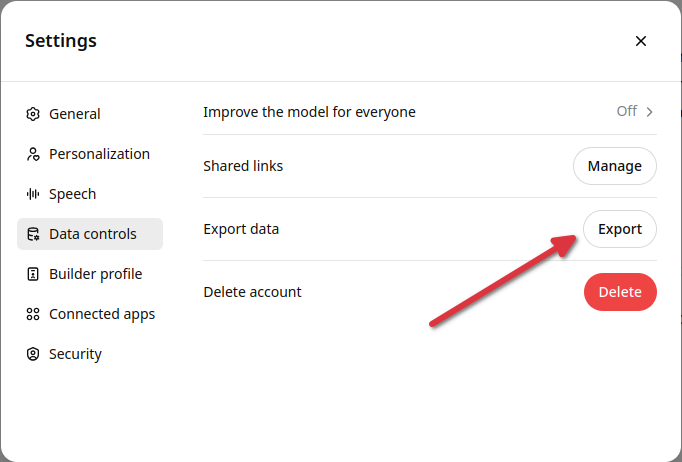
- Choose “Data controls” on the left side and then click “Export”
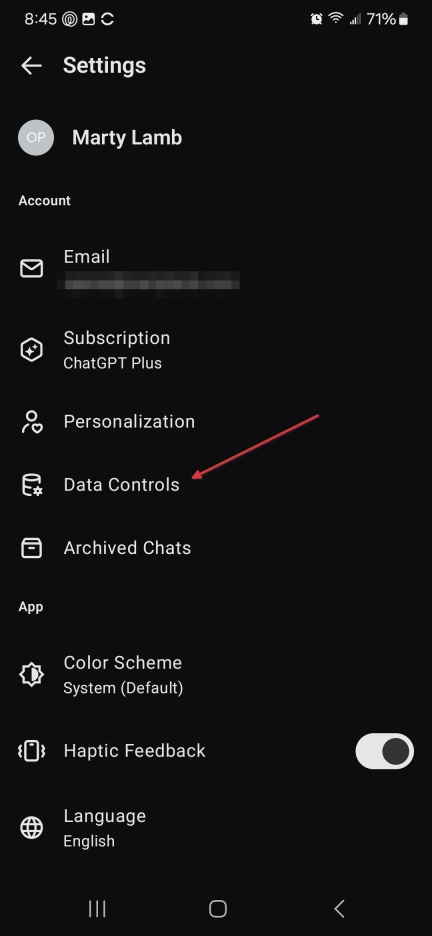
Exporting from the App
- Tap your name in the lower-left corner and then tap “Data Controls”
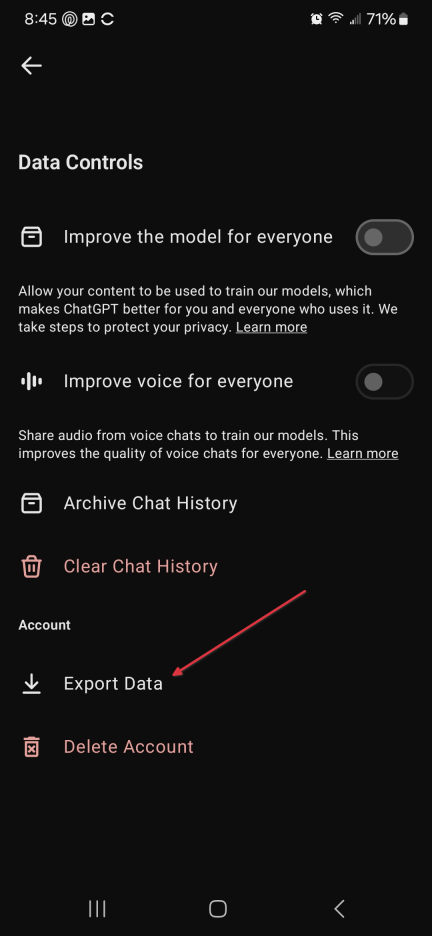
- Tap “Export Data”
Receiving your Export Data
After exporting your data from either the web UI or the app, you will receive an email from OpenAI containing your exported data. This can take anywhere from a few minutes to 48 hours, but you should receive some sort of confirmation within a few minutes that your request was received. If you don’t receive it after some time, check out the OpenAI Community Site to see if exports have stopped working. This has happened a few times before and OpenAI usually gets it working again within a few days.
Once you receive the email, download the .zip file using the link provided.
The rest of this document will refer to the downloaded zip file as chatgpt_export.zip, although in reality the filename will probably start with a long run of letters and numbers and end with a date and time before the .zip extension, like d6678f54...8f07fa6f-2026-03-01-12-19-36.zip (although yours will be different from the example here).
You may want to rename this file for your own convenience after downloading it, but ChatKeeper doesn’t care.
Examples
ChatKeeper provides several options to guide its behavior. This section will start with simple usage and build up to more complicated scenarios.
Note: You can combine multiple command-line options to tailor the functionality to your specific needs.
The Command Line Helper
Who wants to read a manual? If you want to jump right to running ChatKeeper, take a look at the ChatKeeper Command Line Helper, which will help you build your command interactively.
The base command: chatkeeper keep
The chatkeeper keep command is the base command that everything else builds on. All commands in this section will start with this.
Getting help for all options
For the full list of options, what they do, and how they work, use the --help flag:
chatkeeper keep --help
Being extra safe, or “don’t actually touch my files!”
You can run chatkeeper keep in a safe mode that does not actually write any data to your hard drive - instead, it only tells you what it would do. This is a good way to make sure you’re setting things up the way you intend to.
Add the -d or --dryrun option to any chatkeeper keep command in order to execute the command as a “dry run” so you can see what it is going to do:
chatkeeper keep --dryrun [rest of command...]
Getting extra detail when running ChatKeeper
Add the -v or --verbose option to any chatkeeper keep command in order to get extra detail while it is running:
chatkeeper keep --verbose [rest of command...]
This and other options below can all be combined, e.g.
chatkeeper keep --dryrun --verbose [rest of command...]
Converting your ChatGPT conversations to Markdown
To convert your conversations and store the results in C:\path\to\output_directory, run:
chatkeeper keep chatgpt_export.zip C:\path\to\output_directory
If any part of your command contains spaces, be sure to quote that part of the command, like:
chatkeeper keep chatgpt_export.zip "C:\path\to\My Output Directory"
If you run this again with the same chatgpt_export.zip, ChatKeeper will notice that there is nothing to do, even if you rename some of the files in the output directory. If you run it with a new chatgpt_export.zip, ChatKeeper will find and update any previously exported conversations that you have continued since your previous update, even if you have renamed them.
Specifying a folder/subdirectory for new conversations
If you are organizing your conversations into folders after exporting them, then you might want to put new conversations within a specific folder inside your output directory. You could think of it as an “inbox” or “other” or “uncategorized” folder. Running ChatKeeper again with a new chatgpt_export.zip file will find the conversations you have moved (within the output directory) and update those in place, while putting new conversations into the folder you specify.
This is very helpful when using “second brain” applications, like Obsidian.
To do this, use the -p or --path option:
chatkeeper keep -p "My ChatGPT Conversations" chatgpt_export.zip "C:\path\to\My Obsidian Vault"
This will store new conversations in a subdirectory called “My ChatGPT Conversations” under your C:\path\to\My Obsidian Vault directory, while updating other conversations wherever you may have moved or renamed them within C:\path\to\My Obsidian Vault.
Exporting Images
ChatKeeper can also export your generated images. Just like with conversations, you can rename or move them, and ChatKeeper will find them and re-link them to your conversations (rather than re-export them) on subsequent runs.
You have some flexibility on where the images end up, via the-i or --images option:
--images nonedoesn’t export images at all. This is the default behavior.--images samedirexports each image into the same directory as the conversation that generated it.--images fixed:PATHexports all images into a fixed directory relative to your output directory. For example, if you runchatkeeper keep mychats.zip mydir --images fixed:pics, then all images will be exported tomydir/pics. If your path contains spaces, be sure to quote this argument, like so:--images "fixed:PATH WITH SPACES"--images subdir:PATHexports each image into a fixed subdirectory relative to the directory containing the conversation that generated it. That’s a mouthful, so here’s an example: If you specify--images subdir:picsand your export includes conversations that are saved in2025/04/2025-04-06/Image Example 1.mdand2024/12/2024-12-25/Image Example 2.md, then the images for each conversation will be exported to2025/04/2025-04-06/picsand2024/12/2024-12-25/pics, respectively. If your path contains spaces, be sure to quote this argument, like so:--images "SUBDIR:PATH WITH SPACES"
If your markdown reader supports it, the result is that your images are displayed inline with your conversations regardless of where they were exported, just as you would want them.
Limiting the date range of converted conversations
Note: this option requires a license.
If you only want to convert conversations that occur before and/or after certain dates, use:
- the
-aor-afteroption to only include conversations started on or after a specified date - the
-bor-beforeoption to only include conversations started before a specified date
These options expect a date in YYYY-MM-DD format, and may be used together to specify a range of dates.
For example, to only convert conversations that took place in January, 2004, your command might look like:
chatkeeper keep --after 2024-01-01 --before 2024-02-01 chatgpt_export.zip "C:\path\to\My Output Directory"
You don’t need to use both options. E.g. if you only want conversations that took place before January, 2026, your command might look like:
chatkeeper keep --before 2026-01-01 chatgpt_export.zip "C:\path\to\My Output Directory"
Skipping the “scan my output directory” phase
As noted above, ChatKeeper will find and update any previously converted conversations that you have continued since your previous update, even if you have renamed them. In order to accomplish this, the first thing that chatkeeper keep does is scan your output directory to find them.
To skip this step for any reason, add the -n or --noscan option to your command line. Note: if you have previously moved or renamed any converted conversations within your output directory, ChatKeeper will be unaware of them and will create duplicate copies as a result.
chatkeeper keep --noscan [rest of command...]
Rewriting all conversations regardless of whether they have been updated
As noted above, ChatKeeper will find and update any previously converted conversations that you have continued since your previous update, even if you have renamed them. If the conversations have NOT been continued at ChatGPT since your previous update, ChatKeeper will by default not rewrite those files.
But you can force ChatKeeper to rewrite these files even if the conversations have not been updated by adding the -f or --force option to your command line. This might be helpful if you have accidentally modified the files, or if a new version of ChatKeeper is released with new features or changes in its output formatting that you would like applied to all of your conversations.
chatkeeper keep --force [rest of command...]
Skipping archived conversations
Note: this option requires a license.
ChatGPT allows you to archive individual conversations. This removes them from your conversation list in the left panel of the ChatGPT web page, but they will still be present in your chatgpt_export.zip files.
To skip these conversations during the conversion process, add the -s or --skip-archived option to your command line:
chatkeeper keep --skip-archived [rest of command...]
Combining options: a real example
As mentioned above, options can be combined. This example uses several at the same time in order to:
- only export conversations that took place in 2024:
-a 2024-01-01 -b 2025-01-01 - place new conversations in a “My ChatGPT Conversations” subfolder of my output directory:
-p "My ChatGPT Conversations - not include archived conversations:
--skip-archived - update all files regardless of whether the conversations have been continued after my most recent export:
-f - include extra information on the console about the steps that are being taken:
-v - because this is a complicated scenario, we will run this as a “dry run” first to make sure it will do what we want without touching our files:
--dry-run
chatkeeper keep -a 2024-01-01 -b 2025-01-01 -p "My ChatGPT Conversations" --skip-archived -f -v --dry-run chatgpt_export.zip "C:\path\to\My Output Directory"
If you are satisfied with the results of the dry run, then you can remove the --dry-run option to repeat the command and actually perform the operations.
That’s It!
Go give it a try - I hope you find it useful!
